

Posted by Casey Marx on 1st Apr 2025
Sure Footed Stallion - Rebuilding the Front Suspension of a Vintage Mustang
By
Written by Hemmings Contributor - Updated July 3, 2024
Ford’s sporty classic Mustang has been going strong for nearly six decades, which is remarkable for any car line. There remains a deep passion and love for these cars, in part because they’ve existed in driveways around the world since 1964. Enthusiasts continue to buy them, and Ford continues to build them.
One area where vintage Mustangs often require attention is the front suspension. Because Mustang inherited the Falcon/ Comet platform, it also received the Falcon’s rather pedestrian front suspension design. The Falcon’s unit-body platform aided its affordability, and the car’s suspension was designed for a practical commuter automobile—not performance driving. So, while the Falcon underpinnings allowed the Mustang to come to market at a relatively low price, all these years later, it’s not uncommon for those suspension components to need replacement.
We recently followed along with the work performed during a complete front suspension rebuild on a ’65 Mustang undergoing a major facelift at Mustangs, Etc. in Van Nuys, California. Because Southern California enjoys nice weather throughout the year, enthusiasts are able to drive and enjoy their classic Mustangs regularly, so worn suspension parts need to be addressed to ensure a safe driving experience. This is a budget-conscious suspension upgrade that most enthusiasts can afford.
We cannot stress the issue of safety enough. When starting on this type of project, always support your vehicle with heavy-duty 2-ton-capacity jack stands under both frame rails, confirming their stability before getting underneath the car. Coil springs pack a tremendous amount of energy while compressed, so make sure to use a high-quality coil-spring compressor designed for coilover upper-arm applications like Mustang, Falcon, Fairlane, Comet, Torino, and even 1962-’67 Chevy II. The coil springs we are installing pack 600 pounds of pressure just to compress the spring 1 inch. Never stand in the path of a compressed coil spring. Always lay them flat while compressed, and stand away from them during removal and installation.
While you have the front spindles removed, inspect them for scoring and excessive wear. When in doubt, replace the spindle. And finally, it’s a good practice to wear a dust mask any time you’re unbolting suspension components and brakes.
We’re using new suspension parts from Ford and Mustang specialists Scott Drake, part of the Drake Automotive Group, to rebuild our ’65 model. The parts we’re using are intended as stock replacements, to return this Mustang to the condition it was in back when it rolled off the assembly line. The work will ensure plenty more years of smooth, safe motoring.

Drake reproduction upper (p/n C4DZ-3082-RI) and lower (p/n C4DZ-3078-A) control arms are authentic in appearance and have the same specifications as original equipment. You will want to apply chassis lubricant to the lower control arm bushings and ball joints. Lube the upper control arm bushings and shafts, too. Pump just enough grease into the ball joints so that the cups expand, but without leakage.

We couldn’t pass the opportunity to make at least one upgrade during this process by using a 1-inch heavy-duty anti-sway bar (p/n S1MS-5482-A). This will help the Mustang cling to the road by reducing body roll. Polyurethane bushings for the mounts and end links are stiffer than stock rubber pieces and also contribute to improved cornering.

Upper control arm spring perches (p/n C4DZ-3388-RI) are installed first. Drake offers a heavy-duty high-performance spring perch (p/n C4DZ-3388-HP) for the Mustang, and it is suggested you order this one for best results. It takes the clunky stiffness out of the Mustang’s front end.

The coil spring perch locknuts are torqued to 17-25 ft-lb.

Mustangs from 1965-’66 have shims on the upper control arms to adjust camber and caster. It is best to install these shims as they were on the old upper control arms during reassembly, and then have a specialty shop properly align the front end once the work is completed.

With the upper control arms installed, you can see how the shims are configured. The upper control arm is shimmed in or out to control camber. Caster is adjusted by adding or subtracting fore or aft shims to control upper arm angle.
Lower control arms are installed next, making sure the pivot bolts are lubricated with chassis lube. Bolts are torqued to 35-50 ft-lb. From 1967-’73, the lower control arm bolts are fitted with an eccentric, which controls camber adjustment. Caster is adjusted via the strut rods.
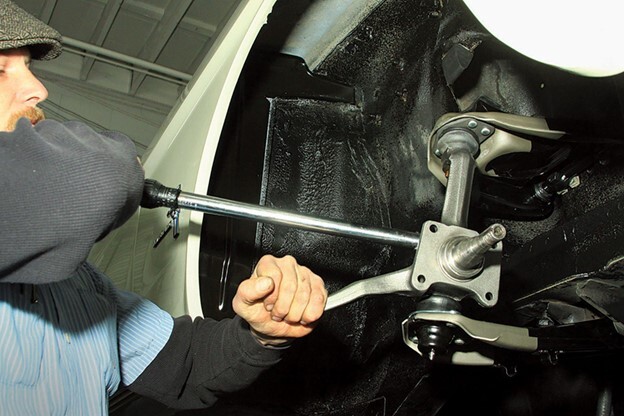
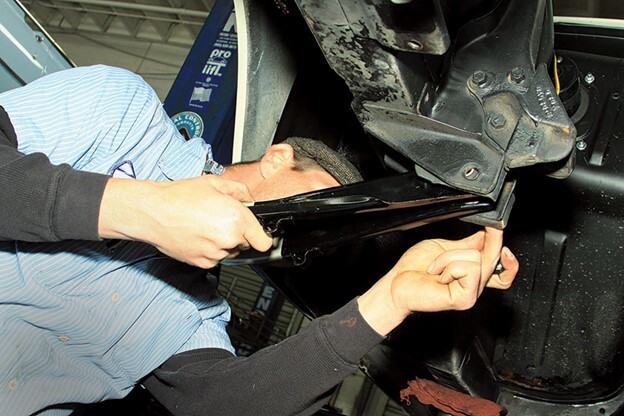
Ball joint castle nuts are torqued to 60-90 ft-lb.

This is how you install cotter pins, properly snipped off at the castle nut, with the upper leg wrapped over the ball stud as shown. Make this a nice, clean installation so the next person to work on your Mustang doesn’t get jabbed.

The coil spring insulator is lubed with white grease for quiet operation, then wound onto the top of the coil spring.

The coil spring is positioned and secured within the spring compressor.

We are using a commercial-grade spring compressor here. Because your Mustang’s front coil springs contain a tremendous amount of energy when compressed, they become potentially dangerous. Should a spring suddenly become uncontained, it can cause serious injury. Always compress the springs horizontally, as shown, and never put yourself in the spring’s path.

Coil springs are seated in the shock tower as shown, then slowly released from the spring compressor onto the spring perch.

The coil spring is slowly unscrewed, placing the spring on the spring perch below. Observe the spring’s movement as it seats—it must sit squarely on the perch, with the spring tip against the stop.

The strut rods both have this reference mark, which means this side faces down.

This is the bolt-on spindle stop, which attaches to the strut rod as shown.

Strut rod fine-thread bolts slip into the strut rod like this. If you’re doing a 1967- ’70 Mustang front end, be advised that 1967 is a standalone strut rod and lower control arm; the hole spacing is different from 1968-’70.

First-generation 1965-’66 Mustangs have this nonadjustable strut rod, making them different than the 1967-’70 design, which is adjustable and controls the caster settings.

Next is the Drake 1-inch anti-sway bar, sporting polyurethane bushings. A thin film of white grease on these bushings and end links will keep them quiet, yet firm.

Anti-sway bar body-mount bracket bolts should be installed heads up in the interest of security and ease of installation. Bolt torque is 17-25 ft-lb.

Stabilizer links are installed next and secured as shown. Bolt torque is 5-11 ft-lb, though most installers don’t use a torque wrench on these links. White grease is applied to the polyurethane bushings for quiet operation.

If you’re replacing steering linkage components (idler arm, Pitman arm, and tie rod ends), use the existing tie rods as a reference to get the new tie rods to the same length. Of course, a good front-end alignment shop will need to be enlisted to get caster, camber, and toe accurately set to specifications.

We’ve opted for KYB Gas-a-Just shocks, which are a good budget-priced shock yielding a smooth ride and durability.